Wednesday, April 10, 2019

Tips for Sewing Y-Seams

For those of you who haven't read my last few posts, I recently stumbled across a local auction of a quilter's stash with the buy of a lifetime for yards and yards of fabric at less than a $1 per yard!  In amongst the totes of fabric were some unfinished projects by the former owner.  One of these was a huge pile of 60 degree diamonds all in yellow floral fabrics.  HUNDREDS of diamonds.

Some I think are beautiful and some are kind of blah.  Regardless, I have made the commitment to not let the effort of the quilter who cut all these diamonds go to waste!  I am going to see how many different baby quilts I can make out of these diamonds.  (yes, I am getting to the Y-seams, hang in there!)

So here is the start of my Diamond Chronicles #1!    I decided to go with star shapes for the first one.  As you can see in this picture, the fabric with stripes on it is a little larger than the rest of them so I'm going to have to be careful to measure and trim everything before I sew them together.

I decided to go with pairs so each star has three different fabrics with the matching pairs being directly across from one another.  I sewed together 8 full stars and two half stars to  be part of a baby quilt.  Amongst the stash that I purchased, I found some yardage of a solid sky blue fabric.   I cut about 30-something more diamonds out of that to go in between the stars.  Like this . . .
I am having a terrible time getting the colors to show correctly.  I'm also noticing I probably should have paid more attention to the shades of yellow I was using.  Some of them are really washed out and some are more vivid.  Not all yellows are created equal.  Well, this will be a learning journey.  I also noticed on the half star on the bottom, the two repeated fabrics are not across from each other as they should be.   Maybe I'll do better on the next one.

  Yes, this pattern means LOTS of Y-seams!  I am plunging in and this will be a perfect practice quilt for that particular method.  I'm pretty happy with how most of the Y-seams are turning out.  There are a few less than desirable but we won't talk about those and press on!  I'll show you the ones I'm excited about!


And here we have three rows of stars hanging on the ironing board and ready to be sewn together.  This will be the true challenge! Not just Y-seams, but inverted Y-seams!   I've watched several tutorials about this and here are the two things that have helped me out the most.  

1.  Before you begin, it is best to mark a 1/4 inch line on the back of all the diamonds on every single side.  (this is not to scale)


2.  As you are sewing the diamonds together, always begin and end 1/4 inch from the edge of the diamond where the 1/4 inch lines that you drew cross each other and make an "X".  You will find this will save you much seam ripping and gnashing of teeth.  

Now these are just tips, you may want to go find a full blown video tutorial to see the entire process but if I can do it (I consider myself somewhere in the range of beginner to intermediate quilter) YOU CAN TOO!

So that is my first installment of the Diamond Chronicles.  My goal is to have this top finished within a week so I can show you that and what I plan to do for Diamond Chronicles Episode #2.

I got some great ideas from you fellow blog readers out there!  If you want to see the ideas that were mentioned, you can read the comments on this post.

I'd love to hear some more diamond ideas if you have them!

Linking to:


Tuesday, April 2, 2019

You Gotta See These Yellow Diamonds!


Yes, I am talking about yellow diamonds but not the kind you might think.  Darn!  This would have made a good April Fool's post.  Too bad I didn't think of that yesterday.

Yes,  as you might have guessed I really am talking about fabric yellow diamonds.  Remember that big fabric haul I won at an auction a few weeks ago?  I am going to share with you one of the treasures found in that purchase.  The lady who owned all that fabric was a prolific quilter but as all of us can relate, she started projects that got abandoned.   This is one of them.


A HUGE pile of  60 degree yellow diamonds measuring 6 inches on each side!  That stack you are looking at measures 8 1/2 inches tall.   I started counting them but when I got to 50, which didn't even make a half inch pile, I quit.  Basically, there are hundreds of them.   

I decided to sort them all out by same fabrics and discovered 
that there are 30 different fabrics represented here.

Some piles only have a few and some have oodles.  So what is a girl to do with a pile of diamonds?  
PLAY!!

 You'll notice that some of these diamonds are not playing nicely with the others as they are too big.  A few of these got cut  a half inch bigger than all the others.

Let's try a star.  I can envision a yellow starbursts pattern happening . . .

How about bigger diamonds!


Chevrons?

How about hexies?  Ooo!  That might be fun!  A chance to practice Y-seams.


So when I first got these I tried to sew a few of them together with  not a lot of success.  I couldn't get those edges to line up nicely. 

 I finally figured out you can't just match up the points and sew, you have to offset them.  I still couldn't get it right.  I happened to see that Katy of the Katy Quilts blog was working on a project with diamonds so I asked her for some tips on how to sew them together in nice straight rows.  She said she would do a blog post about it.  So she did! Here is a link to her Sewing Diamonds Tutorial Thanks Katy!  Your tutorial really helped!

MUCH BETTER!

So I've been playing but I have no idea what I am going to do with all these diamonds.  I think it would make a really fun girly baby quilt for a flower lover.  After just finishing a fairly large project, I am up for something smaller!  What would YOU do with these diamonds??

Linking to:


Thursday, March 28, 2019

All About Strings Blog Hop


Hello everyone!  Welcome to my stop on the All About Strings Blog Hop.  For those who have never been here before, my name is Janice and I reside in southern Idaho in a tiny little farming community. I've been quilting for 3 years now and this is the largest quilt I've ever made!    

Today's hop was a PERFECT motivation to get this quilt finished that I started last year.

I had to take this picture before the binding was on before I ran out of daylight!

This quilt is from a pattern found in the book No Scrap Left Behind by Amanda Jean Nyborg.  She called her version June and said she uses it as a picnic quilt for her family.


Where Amanda used colorful strings to create her slabs, I decided to use only fabrics with black backgrounds.  In the process of making the string slabs, I discovered I didn't have nearly enough black fabrics to make the whole quilt and put out a call for help in gathering some more black scraps.  What a wonderful response  I got!

Here are some of the fun fabrics that came in . . .

I did not use any stabilizer or foundation when making these string slabs.  Just sewed strings together until it was approximately the size I wanted and then trimmed to the proper size.


The color scheme was inspired by this picture . . .

UPDATE:  I've had several people ask me who the artist was and Vireya kindly let me know this painting and others like it can be found here!  Thanks Vireya!

And this is where it's going to live!

The quilting was done by Angie at Sleepy Hollow Quilt Shop with a fun variegated thread.  I normally quilt my own quilts but this one was the biggest one I've ever made at 85" x 85" and it was too much fabric to try and wrestle with on my sewing machine. 


Here is a shot of the crazy backing!


And that is the story of my first finish in 2019!  
And the first quilt I've made that I haven't givven away.  This one stays home!

Thank you to Carla at Creatin' in the Sticks for organizing this hop.  Having a deadline is  a great motivator for me and I love seeing all the variety of ways to make string quilts!
Here is a list of today's participants for lots of great ideas for string quilts:


Monday, March 25, 2019

I Need a Few Testers

Not pattern testers, blog testers.  I've been told that leaving a comment on my blog is a complicated process and a pain in the neck!   I didn't know anything had changed.  Could a few of you leave a test comment on this post and let me know what you have to do?  Then I'll better know what I am dealing with.

Thank you!

UPDATE!! 

OK, I think it's fixed now and it turns out that the reason a few of you have to click on captcha pictures has to do with your privacy settings.  Rebecca at Cheeky Cognoscenti explained it this way:

"No icky Captcha pictures to click on -- yay!! I was having that problem when trying to comment on other blogs, not just yours, and for me at least the problem was on MY end, nothing that you were doing. I'd gotten a new Mac computer and the default privacy settings for Safari were blocking cross-site tracking. That prevented your blog from being able to "see" that I was logged into my Google/Blogger account as me to verify my identity. Once I clicked the checkbox to allow cross-site tracking, I just see that little thumbnail picture of my face next to "Comment as: Rebecca Grace" under the text box. I click on Publish and now it goes right through instead of endless rounds of attempting to prove that I'm a human."

Thanks Rebecca!

Saturday, March 23, 2019

Fun With Owyhee Mountain Quilters!

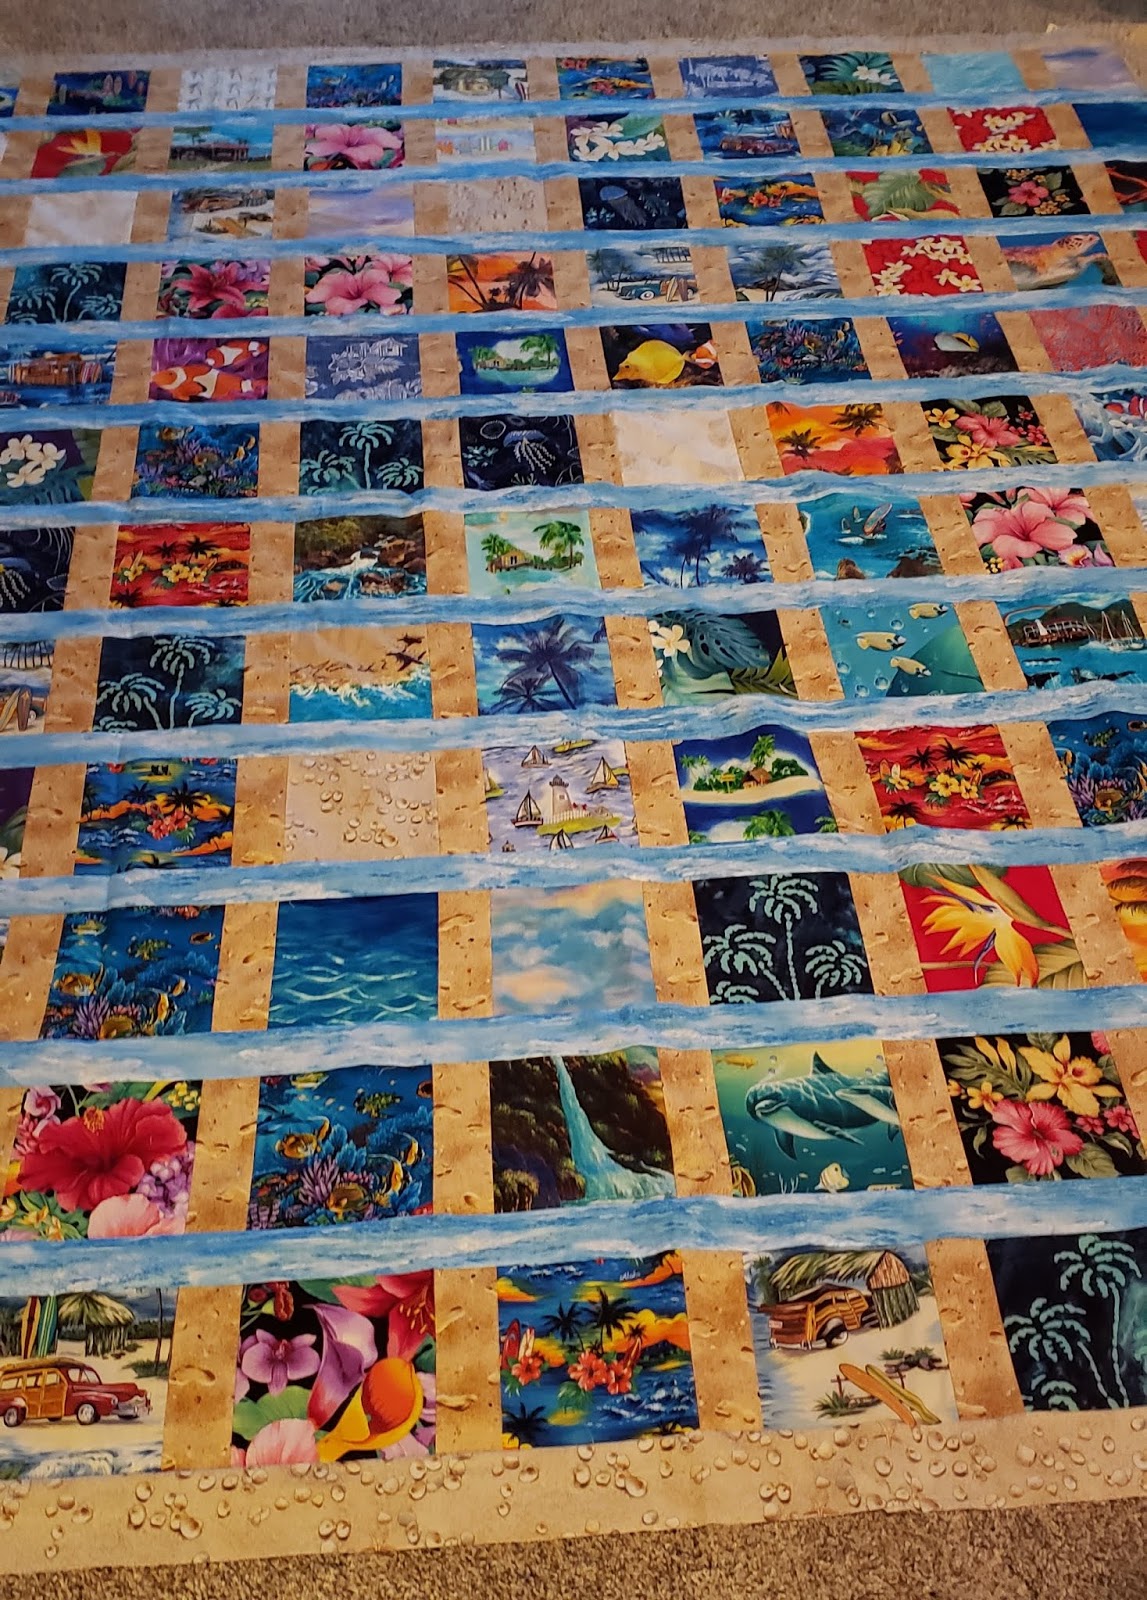
I love show and tell so I'll get right to it!!  Last night was the fourth official get-together of Owyhee Mountain Quilters.  Debbie brought the most fascinating quilt made with Hawaii themed prints.  I couldn't get the whole quilt in the picture but following is as much as I could get and some fun closeups!

I want you to notice the small details.  The sashing between is ocean waves going across and up and down is sandy beaches with cute little footprints in them.   (see below)


Debbie also brought a finished flimsy with bright springy colors.  So springy and bright!  Robin said it reminded her of Easter!  Super cute. 

Robin brought the cutest knitting needle case.  The details are so fun.  First, the sheep fabric she used, second the cute little ruler ribbon that Moda uses to wrap their bundles, inside Robin cut up pieces of the same ribbon to mark pockets for the different size needles she uses.


I'm not sure what happened to my picture of the inside, 
but here is a closeup of the cute needle pockets! "Purl On!"

Robin also brought a quilt top made by her great grandmother!  She wants to finish it but is still in the "looking for the perfect idea" stage.  We'd love to to hear what you would do if this was yours!  What kind of fabric would you choose to finish this Lone Star quilt?


The project Robin brought to work on is called Hibiscus which is a flower commonly found in Hawaii.  We accidentally have a theme going on!
Here are the blocks she's finished so far.
She's trying to decide whether to go ahead and make the twin size or stop at the lap size.

My project?  For my block of the month project, I sewed together 8 of these . . .

And the rest of my time was spent on a new project!  I am excited to share what happened to me two Saturday's ago!  I accidentally found out about an auction near my house that had 50 totes of fabric.  FIFTY!!  I was thrilled to discover there was a lot of Civil War reproduction fabric in there since I have recently developed an attraction to that style.  I purchased 4 totes full and after taking inventory of just one of the totes, there was over 100 yards of fabric in just one tote!  SCORE!!  Then on top of that, my friend Jessie was with me and after everybody had bought the totes they had their eyes on, they sold all the remaining totes for so much per tote winner takes all.  Jessie won the bid and asked me if I wanted to go halves.  I must be crazy but I agreed to do it.   She won the bid at $7.50 per tote for 30 more totes!  Yes, my husband DOES think I'm crazy.

Of course, there was a lot of fabric in there that wasn't what I would have picked or wasn't even quilting fabric and that is going to be donated to someone who will use it.  I will be sharing things about this score of all scores in future posts, but today I will show you just one thing.   Inside one of the totes, I found a bunch of 3" squares sewn into 4-block strips like this:


They were all pinned together in groups of 4 so I assumed the original maker meant to make 16 patches.  So I sewed them all together.  LOVING the old-fashioned vibe of this quilt and the variety of fabrics she used.  Very few repeats.


Now that I virtually have a whole second stash of fabric, I looked around in there for something that would work for sashing and found the perfect thing!  It's a tan background with some squiggly green and red stripes that really goes well with all the muted colors in these blocks.


Not only did I find the perfect sashing but also the perfect back!  Check this out! 


I can't wait to show you this finish! Still need to decide on binding but I'll wait until I get the top sewn together to do that.   I am HAVING SO MUCH FUN playing with and organizing fabric.  😍

Don't forget to share your wonderful ideas for how you would finish Robin's Lone Star!   

Also, if you would like to follow our activities on our Owyhee Mountain Quilters Facebook page, just message me and I'll send you an invitation.  We post other things there that won't be on my blog.  

I hope you are having a wonderful weekend!  

Linking to: