Saturday, September 23, 2017

Great Scrap Buster Block Tutorial

It's my turn to be queen!    Yay!  And I am queen in two different bees for the month of October (yes, I am a little early) so there is going to be some major happy mail coming my way.   Fellow hive mates, you will be helping me make my first ever quilt for my own bed!  I am so excited!!   Getting blocks in the mail will be like getting housewarming gifts!

I don't think the block I'm going to have you make has a name.  At least, not that I know of.  It's just a bunch of HST's and squares arranged in a pleasing way.  Here is a sample of them sewn together.  My favorite thing about this block are all the secondary patterns created when you put them together facing different directions.

There are diamonds

There are X's

Plus signs (this one has a diamond in the middle of it)

And stars!

All from one single block!  It is hard to only make one or two of these blocks because you want to see the secondary patterns develop as you put them together.  I timed myself and from cutting out fabric to a finished block took me less than one hour and that was even after having to rip out a row and sew it on right.    If you hate making points match up, don't worry.  I am not super picky about that.  Once all the blocks are put together, it is the overall effect that holds your attention and not whether the points are perfect.  I love the personality of a patchwork quilt, imperfections and all.

OK, let's get down to business!  (click HERE for simplified directions without all the detail)

FABRIC REQUIREMENTS
You will need two  contrasting fabrics for each block.     They don't have to be the same color, as long as one is light and the other one dark.  If you're unsure, just choose one favorite fabric of yours and then a low volume or white on white fabric to go with it.

NOTE:  The fabrics in the shown sample are kind of old fashioned and dated but my preference is for bright and modern.

For you that like to fussy cut, even novelty fabrics are perfectly ok as long as they contrast with the partner color and are on the bright side.  Did you notice the frogs and the bees?


If you don't have any brights, just choose your favorite.  Small scale prints  that read mostly as one color work best; however, if you do use a large scale print as one of the choices, it works best if the other fabric is a solid or a tone on tone.   Let me show you how one fabric can be both the light and the dark in two different blocks.  Here we have the orange as the dark fabric in one block and as the light fabric in another block.  Again, the key is contrast.


CUT:
One 5 3/4" square and four 2 1/2" squares from each of your fabric choices.  That's it!  This will make an 8 1/2" block that finishes at 8 inches.   Since it is so small, please make two blocks and no need to sew them together.

SEW:
Eight 2 1/2" HST's using any method you prefer.  Following is my favorite method:

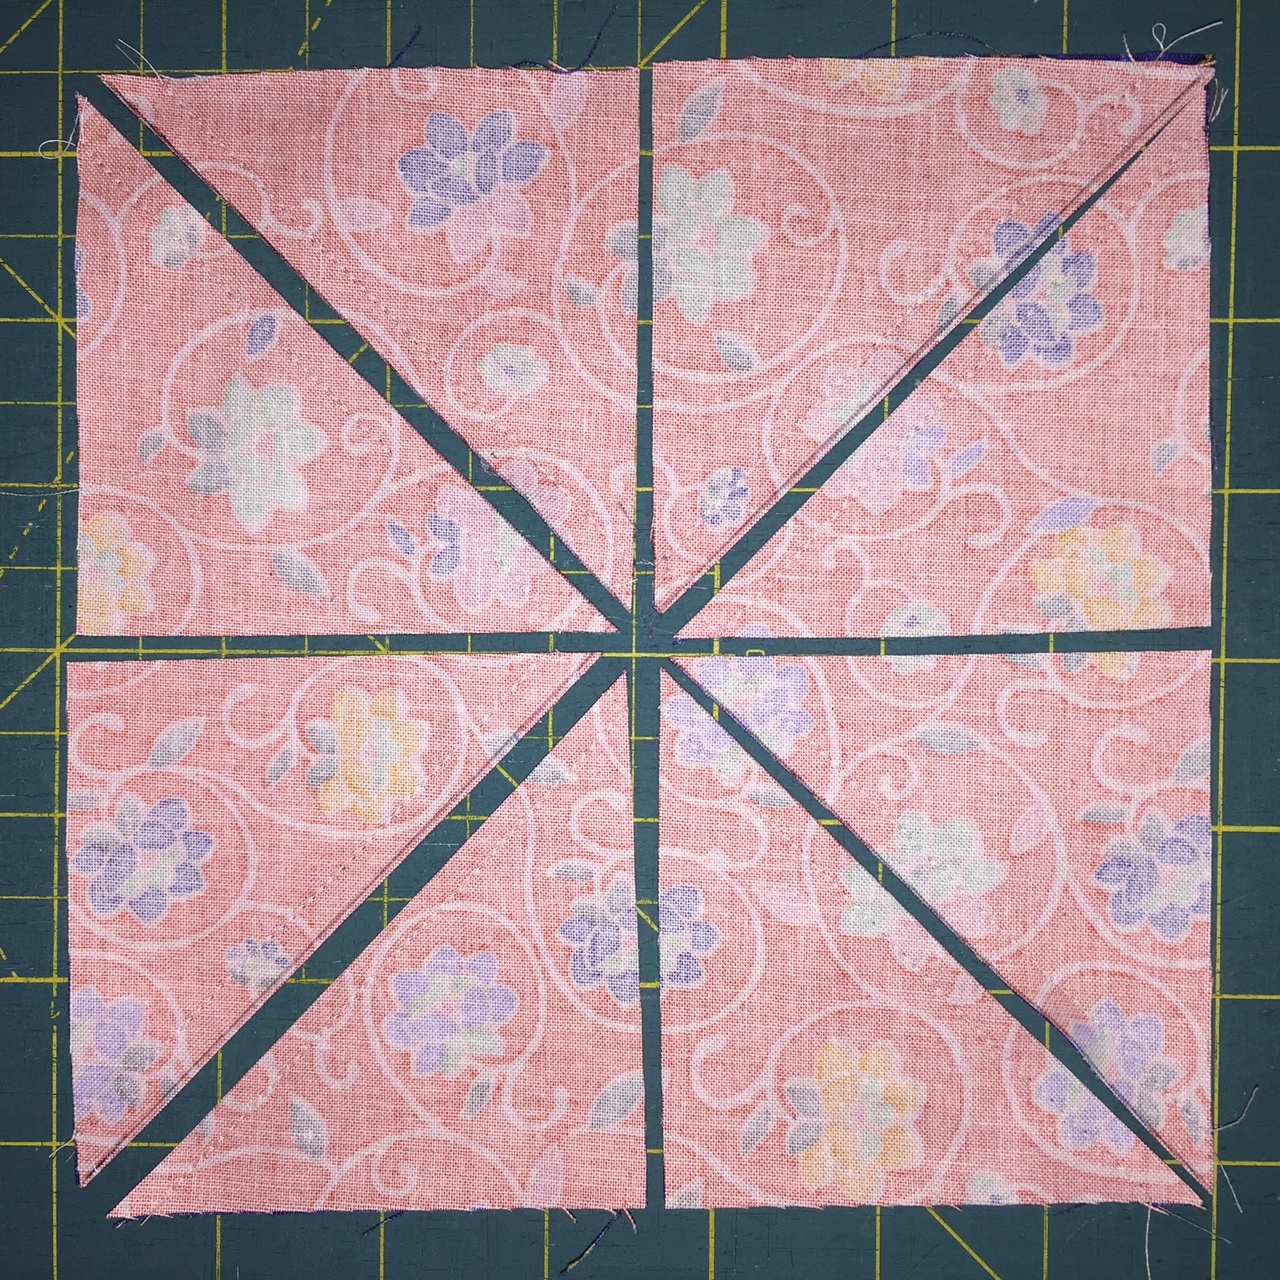
Take the large square of each color with right sides together.  Draw lines from corner to corner on the lighter color like this:

Sew 1/4" inch away from the line down one side and back up the other on both of the drawn lines.  I forgot to take a picture of this step so I am borrowing this from a tutorial I already have.  Here are the sewn lines:

Next, cut on both of the drawn lines and without moving the block cut from the middle of the left side to the middle of the right side and from middle top to middle bottom like this:

You will have 8 little half square triangles in no time!  Trim these HST's to 2 1/2" and for best results, please press open.    This is the only place I will ask for this.

The way I trim is to first make sure that the diagonal 45 degree line on the ruler is exactly on top of the seam between the two colors and the corner is as far up as you can go (making sure your diagonal line is still exactly on top of your diagonal seam and then trim off the dog ears and top and right side if necessary.

Then turn the half square triangle all the way around so the right top corner you just trimmed now becomes the lower left corner, again placing the 45 degree line exactly on top of the diagonal seam matching up the 2 1/2" marks on the ruler to the bottom and left edges of your square.  Then trim.  My HST's size before trimming turned out large because I accidentally cut my squares 6 3/4 instead of 5 3/4.  It still works!

Now for the arranging.  It works easiest if you start with the four light squares and arrange them like this:


Then add 3 HST's on each side of that row with the darker side toward the four light squares you had in a diagonal line.  You'll end up with three butterflies.

 Then take the four dark squares and add two of them to each side like this:

And then the final two HST's with the light side pointing toward the corners.

Sew together one row at a time and wait until you have all four rows sewn together before you press.  Press the seams on the first row one direction (doesn't matter which way) and the the second row the opposite direction, alternating directions for all  four rows.  I tried doing it with pressing the seams open but it really does work better to be able to nest the seams together.  Your points will come out better.

And now you should have a nice finished block.  I am looking forward to seeing every color of the rainbow appearing in my mailbox!  HAVE FUN!

P.S.  I've already had one person tell me she was a little confused by what colors I want.  I prefer bright and bold colors in either tone on tone or a small print, but really just about anything will work. The main goal is to have high contrast.  If you are having trouble figuring out what to choose, just use a low volume or white for the light color.

Here are some examples of fabric pulls I will probably be making from my own stash.  Hope this helps!  And yes, although I donn't have a purple example here, I like purple too.  Anything goes!


Linking with:
Confessions of a Fabric Addict

HST Block Scrap Buster Tutorial

This tutorial makes a very simple block that when turned different directions makes some really great secondary patterns.  Here is a picture of two finished blocks.  Always put the lighter color in the position of the light aqua in this first block.  In the second block, the orange is the lighter color so it now is placed in that position.

Here is an example of what the blocks look like when arranged properly and sewn together.   I love this scrappy patchwork look!


FABRIC NEEDED:
Two colors, one dark and one light.  They don't have to be in the same family as long as one is dark and one is light and there is plenty of contrast.

CUT FROM EACH FABRIC:
One 5 3/4" square
Four 2 1/2" squares

Using the large square from each fabric, make 8 HST's as follows:
Draw diagonal lines from corner to corner to make X on back of lighter square:

Sew 1/4" inch away from the drawn lines on each side of both lines:

Cut on lines and also from top to bottom and from side to side as follows:

You will have 8 half square triangles.  Press open for best results.  This is the only time you will need to do this.

Trim to 2 1/2 inches.

Arrange all square and HST's as follows (always put the lighter color where the orange appears in this block)

Sew each row together and wait until all four rows have been sewed before presseing seams.  Press the first row one way, and row two the opposite way and keep going back and forth like that so your seams will nest together nicely when you sew the rows together.

Ta da!  You are done!


Friday, September 22, 2017

2017 Quilt Bloggers Quilt Show

Each year AmysCreativeSide hosts a virtual Quilt Bloggers Quilt Show.  If you are looking for a lot of fun eye candy, hop on over to see all the amazing talent out there.   Wow!  This will be entry #1 for me.  We are allowed two.

Most of these quilters are waaay out of my league but I'm going to enter something anyway just because I am excited to be able to say I finished my first quilt that's bigger than a baby quilt this year.  It actually was intended to be a baby quilt but the person who asked me to make it wanted something the baby could grow into and use when they were older too so it's closer to twin size.

My inspiration?  The baby room!

It is not easy to find baby fabrics in kelly green so I just decided to go with the colors whether they were babyish or not.  Here is what I did!

I I do have a thing for big patterns and bright bold colors.  Kaffe Fassett and Amy Butler fabrics fit the bill very nicely!  Now the challenging part was quilting this!  I have never quilted a big quilt before and even though this one was barely twin size, it was HUGE to me! 


Here are a few views of quilting on this quilt.  At the time I finished this quilt, I had only been quilting for a little less than a year.  I am having so much fun with this art!  Just wish I could get a few more finishes under my belt!


I don't know what this pattern is, but I definitely got things a little too dense here.  No wonder I got tired of quilting!  This took forever!


But in the end, I feel so happy that I actually finished a real full size quilt!  What a fun journey that was.  The greatest part is that the new mom was very happy with it.  And here is the new owner!


Now on to visit the Quilt Show!


Sunday, September 10, 2017

Puppies and Stuff

I will extend my sincere apologies right now to all my Stash Bee-mates whose blocks are late.  Moving really messed me up.  I got two out of three done in August but never got them in the mail.  I finally got the third one done today and will mail all three tomorrow.  And yes we are FINALLY moved in!

This first one of my bee blocks we were asked to make one of the puppy blocks originally from a 2015 Quiltalong from  Lorna at Sew Fresh Quilts.  Ann, our queen asked that we choose one of the patterns that reminded us of a dog that had meaning to us.  So I chose our favorite dog ever, who was a wedding present.


Her name was Jodie and she was our first pet before we ever had any children.  When she was a puppy, we had a back door that didn't latch very well and we started coming home finding her inside the house and the back door standing wide open.  Not good in the middle of summer with flies all over the place and the AC blasting away.  In one day, we were able to train her to shut the door after herself!  She was one special dog, and we miss her a lot.  We've been married for 27 years now and she's been gone for a while.  There hasn't been another one as special since.

My second bee block was for Mary Ann in Stash Bee Hive #6.

My third bee block was for Merrilee for the 2017 Bee Hive Swarm.  I consider this one a fail because even though she did ask for these colors, I didn't get the right values in the right places so I lost some of the star effect.  I gave her permission to operate on it if it needed to have surgery.

This week, I was able to finish Kenzi's quilt top!  But oops!  One of the fabrics wasn't quite as long as the others so I need to trim another inch or so off one side.  It ended up being quite a bit bigger that I was planning anyway, so no big deal.


Now I just need to wait for her to pick out what she would like on the back of it.  What kind of quilting do you think would look good with this particular pattern?  Did I already ask this question?  I can't remember!

My quilting room is a mess!  Lots of boxes still to unpack and get out of the way.  I need to get a design wall hung up and I think for now, I'm going to go with the ol' standby of tacking up a piece of batting.  That works quite well.  I'm not going to show any pictures of the house for a while until we get a little bit more organized.   I am sooo grateful to be in my own home now!

I'll close today's post with two pictures that make me happy.  The first is the view out our back patio (from our bedroom).  I get to see such beautiful sunsets out here.  Mmm.

And the second is finding a good sale on reader glasses that are actually cute!  Aren't these fun?

Well, I am hoping to get back into the groove of things and get some things done that I committed to doing!  I hope to have a few finishes to share one of these days!

Linking to:
Love, Laugh, Quilt
Cooking Up Quilts
Needle and Thread Thursday