Sunday, January 22, 2017

SOOOO Close!

Do you know what this picture means?


I am getting ready to put binding on my first 2017 finish!!  YAHOO!!!   It's also the first quilt larger than a baby quilt that I pieced and quilted all by myself!  I am so excited to be finished with this quilt.  I've been working on it since last May (off and on) and it felt like it was never going to be done.     So this is is just a peek and I'll show the whole thing when the last stitch is officially done! I don't think you understand what a HUGE deal this is!  I'm not a finisher, I have a lot of UFO's but rarely do I finish.  My BQF (best quilty friend) Robin even commented and I quote "I haven't known you ever to finish anything!"  Ha!  Ha!  It is so true!  So I will be celebrating bigtime when that binding is done.  

As I've shared in past posts, I'm the queen bee for one of the three Stash Bee's I'm involved in and here are the blocks that I have either made or received so far.  So excited to see the rest of the blocks!


The queen of my second Stash Bee (I've in Hive #6) asked for THIS block.  My first attempt at paper piecing.  I enjoyed making this block while learning a new technique I hadn't tried before.  Sharon, I will get this in the mail to you on Monday,

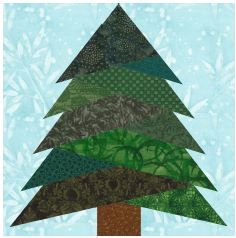
For my third bee called 2017 Bee Hive Swarm the queen asked for tree blocks in any size and pattern (she wanted a variety) so I was eager to try out my paper piecing skill.  I shared in a previous post how frustrating this experience was but I'm happy with the results.  The second tree is just a bonus I threw in and, Emily, if you're reading this post, you don't have to use this one.  I was just goofing around when I made that one.  Yours is also going out on Monday.

And finally, see these stairs?


Behind this door is my happy place!  My sewing room!   I think the space above the door is screaming for some mini quilts, don't you?  Since Man Caves are a thing,  I would love to have one that says Quilt Cave.   Ya gotta admit this looks kinda cave-like.   I have been so impressed by the ideas and suggestions I have received from my bloggy quilty friends about all sorts of other things, anybody got some great ideas on how to make a cute Quilt Cave mini quilt?

Linking to:
Monday Making at Love Laugh Quilt
Design Wall Monday at Patchwork Times
Finish it Up Friday Busy Hands 
Main Crush Monday at Cooking Up Quilts


Saturday, January 14, 2017

Future New Dorm Quilt

So much for good intentions.  I was going to try and not buy any new fabtric for a while and only do new projects from my stash.  At the same time, I noticed that my stash is pretty dated with mostly traditional fabrics and not a lot of colorful and modern.  So I decided in order to satisfy my fabric buying urges, I would only buy a few new pieces once in a while just to update my stash.

So I bought these fabrics which were on sale:

Guess who wants a quilt using the colors I bought?  My college-bound daughter, Ashley.   It didn't occur to me when I bought these that periwinkle is her favorite color.  Must have been a subconscious thing.  Well it didn't take a lot of convincing for me to start planning a new project.

The pattern I will be making is from Erica at KitchenTableQuilting.com and is called the Betty Quilt.  She said it was named after several women who were influential in her life.  Pretty coincidental that one of Ashley's grandma's is named Betty too:


So I headed back to the store to get some more fabrics and here is the palette I ended up with:


And here are the cut up pieces all ready to sew!


I HAVE to get that heart and chevron quilt quilted this weekend so this is my incentive.  No sewing on this project until I get that quilting done!

Linking to:

Sunday, January 8, 2017

Update on My Vintage Quilt

A few days ago I posted about this vintage quilt top:


I got a lot of GREAT ideas for what to do with it and some great help on trying to identify what it is.

The closest pattern was found in Barbara Brackman's Encyclopedia of Pieced Quilt Patterns.  
Thank you to Wanda at Exuberant Color for finding that!  


The rows are offset rather than side by side and the in between pieces look to be more rectangular than square like the ones in my quilt.  But that's definitely the same idea.

Bonnie Stapleton of Institches with Bonnie also found a block that at least had the shape of the "bowtie" looking piece also in Barbara Brackman's Encylopedia of Pieced Quilt Patterns.  Block 3350 and 3351. Versions of the Drunkard Trail.


In talking with an appraiser, she said that in appraiser lingo that quilt came from a quilter with a "deep scrap bag" which means it spanned several decades with the most recent fabric being from the 1940's.   If anybody out there has any of these fabrics (you can see each different one in detail here) please let me know.  I would love to purchase any scraps I can find to possibly use in the binding or back.     I really like the idea of trying to finish this quilt with vintage fabrics from the same era if possible, or at least close to it.    It will be difficult, but I love a good challenge!


What I Learned About Paper Piecing!

In one of the Stash Bee's I belong to, the Queen Bee this month requested tree blocks!  She even gave us links to a variety of different tutorials we could use some of which were very simple and easy to do.  What did I do?   Chose a complicated paper pieced block above my abilities.  Should have known better.

Here is the pattern I chose to make:


Why did  I choose this pattern?  Well, I love it!  But mostly because I got a little too overconfident in my abilities after my doing so well with my first paper pieced block shown here:


No, I did not choose the Christmas version as that would have been even harder!  This is my second attempt at paper piecing and although I finally did get an acceptable block in the end, I went through a ridiculous amount of ripping out stitches and would like to share what I learned to avoid that in the future!

Here is the final result:


OK, here comes the valuable stuff!

1.  Many of the tutorials that I read say that when you are first learning, it will be best if you cut your pieces overly large to make sure you are going to cover the area you are trying to cover.  HEED THIS ADVICE!   I can't even remember how many times I had cut my pieces too small and had to rip them out because I misjudged the shape or how it would lay after sewing it on.  Even when you think you're cutting them big enough, cut them just a  little bit bigger still. They can be trimmed later.  You will probably have a little more waste at first, but it is so worth it until you are able to get the hang of it.  

2.  It helps to print two patterns, one for sewing on and one to cut out the pieces and lay on the fabric you will be cutting.   I think later, after I get more experienced, I won't have to do this step but it helped reduce the number of times I had to redo.  IMPORTANT TIP:  When you do this, cut out the piece of the pattern laying print side up but lay it on the BACK side of your fabric instead of the front.  That is because your final block is going to be a mirror image of what the pattern looks like.  If you cut it on the right side of the fabric, it will be wrong.

3.  One of the tutorials I read, advised to sew several stitches in place before you sew your line.  Do NOT do this.  When you're sewing with smaller stitch lengths, it makes it nearly impossible to rip out and it isn't necessary anyway as long as you start about 1/4 inch before the line you actually need to sew.  Stitches will be locked in by other seam allowances or the binding.

4.  Make sure you check and double check which line you are should be sewing on.  I knew which piece of the pattern I should be sewing on, but several times started sewing on the wrong side of that piece.   This caused me several ripouts.

5.  Check and double check that your fabric is facing the right direction before you sew.  I messed this one up a lot in the beginning.

UPDATE!  Since I wrote this post, Emily Leachman of the Darling Dogwood just gave me another great tip.  Using solids or batiks helps eliminate this problem because they don't have a wrong or right side.  Noted!

6.  Last, but not least.  pinning is your friend.  I made the mistake several times of just holding the piece where I wanted it to be, turning over to sew on the pattern only to find out my  piece had shifted before I started sewing.  AAAARGH!!  (My favorite quote from Charlie Brown)

For anybody that hasn't actually tried paper piecing yet, all of this will make more sense to you once you have actually tried doing it.  It may sound like Greek right now, but go give it a shot!

We learn way more from our mistakes than we do our successes, don't you think?  What mistake did you learn the most from?


Linking to:
Sharing Sunday's at The Creative Side


Thursday, January 5, 2017

Happy Mail!

As you may or may not know, I got kind of crazy and joined 3 Bees this year.  The whole point of these Bee's is to use fabric from our stash's to create blocks for the other members of our hive when it is their turn. This month, it is my turn to be Queen Bee in one of the hives and this is the block that I chose to have made for me.  I asked for it in bright colors.


I've been fiddling around and made a few of my own.  Here is the first version:


And here is the second one that I made.  I thought the colors would be a lot of fun when I chose them but when I got the block sewed together it reminded me of a scary clown!!  Ewww!


I may be switching out the middle block for a different color but I'll withhold judgement until I see how it looks  with all the other blocks.

I have received what's known in the biz as Happy Mail!  Mail that has something fabricky or quilting related.  This particular piece of happy mail came from a fellow Bee member from the Bee Hive Swarms 2017 bunch!  Not just one block, but THREE!!  Yahoo!  There was a really neat card (I want some of these)

And some yummy Jelly Belly's!  Some pretty great Happy Mail, I'd say!  A
And yes, it is true.  I have not taken my Christmas decorations down yet!  Maybe tomorrow.  :)


Here are all the Double Star blocks that I have so far . . .


That's all for now.  I have already been informed that I don't have to go into work tomorrow due to the heavy snowfall.  We have had more snow in the last 24 hours than we have had for more than 30 years!  Crazy!


Linking to:


Wednesday, January 4, 2017

Fascinating Vintage Quilt Top

Today I want to talk in detail about a vintage quilt top that was given to me so if you're not into old quilts, you may want to skip the rest of this post.   This quilt has me very curious and I am hoping I can recruit some of you quilters that have been quilting for years and years to help me date it and name the pattern.  It is NOT Bow Ties.

Here is a picture of the entire quilt:


My mother-in-law thinks it might have been made by my husbands great grandmother.  So possibly from the 1940's? or thereabouts?   It was made using a pattern I have never seen and many people keep telling me it is a Bow Tie quilt but it is not.  Each colored section is one entire whole piece.  Has anyone else seen a quilt made with this pattern before?  Do you know what it is called?  I have asked quite a few people and nobody knows.  I would also like to date it if possible.  I have taken a picture of each fabric in the quilt.  You can see them here.  There are 25 different fabrics.  If you have any of these in your stash, I am looking to buy!  (or even similar fabrics from this era).

This quilt is entirely hand pieced.  If you take a look at the last two rows, you begin to see fabrics that do not appear anywhere else in the quilt.  I think she was running out of scraps!  Also, look at the fabrics that are 3rd from the left on the bottom row and on the far left on the 2nd bottom row  She didn't have a big enough piece for either one of these pieces and pieced them together.

I am planning on quilting this following the wavy curves and stitch in the ditch like this:


What should I use for the binding?

Update:  I have spoken with a professional quilt appraiser via e-mail and when the weather calms down am considering driving this a few hours to get it appraised.  But what she did tell me was every interesting.   She said that this quilt marker had what appraisers would call a "deep scrap bag" which means it spanned several decades, the most recent being from the 1940's.   So some of these fabrics may possibly be as old as the 1920's.   Fun!  I also neglected to show you what the back looks like and a closeup of the hand stitching.  Such tiny stitches!

This quilt is not using the traditional make a block and sew them together method, the appraiser I spoke with said she possibly used some sort of applique method. Interesting!


UPDATE #2!   Wanda from Exuberant Color found a pattern that is the closest I've seen yet.  It's rows are offset from one another instead of side by side like my quilt but very, close!  She found it in Barbara Brackman's book Encylopedia of Pieced Quilt Patterns.


Thanks for reading about my journey with this vintage quilt and a reminder, I am hoping to finish this quilt with fabrics from this era so if you have anything from the 1920's through 1950's that would go well with this quilt, please feel free to contact me!  Just leave a comment on this post and I'll get back with you.  Thanks so much for stopping by!


Linking to:
Let's Bee Social
WIP's on Wednesday
Midweek Makers
Needle & Thread Thursday


Tuesday, December 27, 2016

Best of 2016


Cheryl over at Meadow Mist Designs is hosting a linky party in which we share our top five posts, or finishes, or things we learned.  It is our choice as long as it is five.  :)

1.  Favorite Finish

This was a baby quilt for my niece.  Her baby was supposed to be a girl but a few weeks before the birth we found  he was a boy!   So this quilt may or may not get used depending on future babies!


#2 Favorite First

I had many many "Firsts" this year but my favorite was organizing a mini quiltalong with fellow friend and blogger Jen Rosin at A Dream and a Stitch.  This was also among the posts with the highest views.  You can read that post here.   I had quite a few missteps along the way to making my Rainbow Crumbs, but had a ball doing it.  It was a very fun quick and easy project.  I will for sure be organizing another one of these quick and easy mini quiltalongs.  Let me know if you want to join in!

Please visit the gallery to see all the shadow block creations and few that were made afterwards.


#3 My Favorite Post to Write:  The Interview

The post I enjoyed doing the most was interviewing my BQF (best quilty friend), Robin Ryan.  I shall be doing another interview very soon showing a few new things she has created since then.

#4  Favorite Thing I Learned How to Do


Quilting of course!  Thanks to Robin!  As a result of that, I also learned how to blog, how to do a quilt-along, how to paper piece,  learned what a linky party was,  and learned that I cannot stick to one project at a time.  I love having multiple things going on at once.  Of course, I don't get nearly as much done, but oh well!  I am having fun along the way.

#5 Post With the Most Views

Believe it or not it was just a simple tutorial that you can find all over the internet!  I guess tutorials are quite popular.  It was sharing a block I want to start collecting and an easy tutorial for making 8 2-inch HST's (half square triangles).   I started the quilt below but the blocks were much too tiny so I am starting all over and doubling the block size to someday have a finished quilt for my bed.


I am so excited to start 2017 and hope to have a lot more finishes to share next time.  I hope your Christmas was full of good memories with family and friends.

Linking to:
Let's Bee Social at Sew Fresh Quilts
Midweek Makers at Quilt Fabrication
WIP's on Wednesday at Esther's Blog


Wednesday, December 21, 2016

January Stash Bee

I love trying new things and one of those is joining a Stash Bee.  All participants are divided into groups of 12 and each month one lady gets to be the Queen Bee and decide what block the others in the hive will be making and then they are all sent to the Queen Bee of the month.  I not only joined one Stash Bee but three!  It may sound crazy, but it's only 3 blocks per month.  I think that is doable.

I am Queen Bee for the month of January in the Bee Hive Swarms 2017.   We are given 25 blocks to choose from for our monthly block.  Here is the tutorial to the block that I chose:

It is called Double Star and here is my sample block:


I wanted to get this done early so the rest of the ladies in my hive could get an early start if they wanted to. I kind of rushed through the color picking and  I'm not totally thrilled with my color choices.  I think I'll make another one with brighter colors.  I can't wait to see with what everybody comes up with!

I'm guessing most of you are in full steam Christmas preparations about now.  :)   May your Christmas be a beautiful time with family and friends.

Linking up with
Let's Bee Social at Sew Fresh Quilts
WIP's on Wednesday at Esther's Blog
Midweek Makers at Quilt Inspiration
Needle and Thread Thursday at My Quilt Infatuation

Saturday, December 17, 2016

Grip and Stitch Quilting Tool and More Quilting

I have been quilting for two hours and need a break!  So I'm stopping to just show you my progress and also share a quilting tool that I really love!

When I start to quilt something, I usually make myself a small sandwich to warm up on and to make sure my tension is right.  So here is today's warmup:


The motif in the bottom left corner is what I decided to use in the top and bottom triangle edges left as a result of the chevrons.   Got that all done!  Yahoo!  Here is a pic of one of those:

I realized that I probably quilted too close to the edge on some of those and the binding is going to cover up some of the ends of the feathers.  I am NOT redoing those.  Forging ahead!

Next I tackled the odd shaped white rows between the chevrons and hearts.  I pondered and pondered what to do there and I think something with straight lines would have been kind of cool there but I'm not good at straight lines yet and don't own any rulers right now.  So I went with some allover patterns.  The first one is supposed to be a paisley meander.  It doesn't look NEARLY as nice as the way Angela Walters does it and in fact is kind of unrecognizable, but that row is done.


The next row I did in spirals.  I am trying REALLY heard to make bigger patterns and I think I succeeded in making them larger than I usually do, but they are still denser than I wanted to do.


I've got one more row of white allover pattern to do, and one more row of hearts and then I can start binding!  YAHOO!!!

Now I would like to share a tool with you that I absolutely love.  

They are called Grip and Stitch Quilt Discs.  They are an alternative to using quilting gloves.  A lot of people use the Machingers gloves when they quilt and they do work very well, but they are a pain to have to keep putting on and taking off when you need to change the bobbin.  Last September, I won a tool in a giveaway by Ellen Holder at Clever Craft Tools.  Thanks again, Ellen!  I am so pleased with these and I use them all the time!  (not affiliated, just like them!)

I hope you will go visit Ellen's site to read about them in detail and if you decide to buy them, tell her Janice sent you. Leah Day also recently did a blog post about them and she said that her dad, who suffers from arthritus, can quilt much longer using these than when using the gloves.  When I need to change a bobbin or get more thread, I just set them on top of my machine until I'm done, grab them and go!

Also, a big thank you to Alison at Little Bunny Quilts who showed me something new this week. I am definoitely a lover of learning.   I didn't know there was a way on Bloglovin to see what your blog rank is.   I'm not into trying to make money with my blog, but I'm a HUGE statistics lover and I am excited to track if there is a way to show I am improving.   So this is going to be fun.  I signed up for the Analytics and since I haven't done a post since I signed up, I'm assuming I'm at the very bottom.  It will be interesting to see what happens to my rank after this post!   Out of over 60,000 blogs, Alison is 820!  WOW!!!

Here is where I am before today's post.  Ha!  Ha!  I've got lots of room for improvement!

I sure do enjoy this and reading other quilting blogs too.  Hope you all are having a great weekend!


Linking to: